Showing posts with label freezer meal. Show all posts

Monday, August 15, 2011

Creamy Green Chile Chicken Enchiladas


I think I need to work on my food photography skills....but it sure tastes good!!!

Feeding Finley as been quite the learning experience. She is a *little* independent and has NEVER let us feed her baby food or put utensils up to her mouth. She has wanted to do it all on her own. So the challenge has been to find foods that our toothless darling can eat. We were amazed at the way should could put down steamed broccoli, peas, even grilled chicken without any teeth.

In the last week, two little teeth have just begun to break the surface of her lower gums and it has opened up a whole new world of eating for our little darling. I'm not a big fan of having special foods just for the baby, instead I try to just feed her what we are having for dinner. I was SUPER surprised when she gobbled up this enchilada recipe. The tortillas were a bit too difficult for her to manuver without full teeth but she gobbled up the chicken and black bean filling. Now I know that spicy food is right up her alley (although this dish isn't too spicy, just a little kick from the chiles).

The original recipe is from Mel's Kitchen Cafe. I like it because all of the ingredients are things that I typically keep on hand. These enchiladas are jam packed! So I said that it makes 6 servings, which would be 1.5 enchiladas per person. The original recipe would provide:
723 calories
40.5 g fat
55.3 g carbohydrate
6.4 g fiber
35 g protein

I made a few basic changes like using reduced fat cream cheese and sour cream. I also only sprinkled the top with a 1/2 cup cheddar, instead of putting a few tablespoons of Monterey Jack in each enchilada plus cheese on top. I also substituted good old La Tortilla Factory Low Carb tortillas.

This recipe would be great for doubling and freezing or just halving and freezing, depending on your family size. I will definitely be making it again!!!

Creamy Green Chile Chicken Enchiladas

3 cups cooked chicken, shredded
2 (4 oz) cans green chiles
1 pkg reduced fat cream cheese
1 can black beans, drained and rinsed
1 Tbsp light margarine
1/2 cup chopped onion
1 Tbsp flour
1/3 c. chicken broth
1/4 c. skim milk
1 can (7 oz) green chile enchilada sauce
1/2 c. reduced fat sour cream
1/2 cup cheddar cheese
8 La Tortilla Factory tortillas

Preheat oven to 375. In a medium bowl, combine softened cream cheese and green chiles. Mix well. Add the chicken and black beans. Mix to combine, set aside.

In a large nonstick skillet, melt the margarine over medium heat. Add the onion and cook, stirring occasionally, until the onion softens and starts to turn translucent, about 2-4 minutes. Sprinkle the flour over the onions and stir well. Cook for 1 minute until all the flour is cooked and nutty. Slowly whisk in the chicken broth and milk. As you whisk and the mixture cooks, the flour will get less lumpy around the onions and the mixture will become smooth. Cook over medium heat until the mixture is bubbling and has thickened. Remove the skillet from the heat and stir in the enchilada sauce and sour cream.

Spray a 9x13 inch baking dish with nonstick spray. Spread about 1/4 cup of the sauce on the bottom of the dish. Fill each tortilla with about 1/2 cup of the chicken mixture. Roll the tortillas up and place seam side down on the prepared baking dish.

Pour the white sauce over the top of the enchiladas. Top with shredded cheese. Bake for 20-30 minutes until the enchiladas are bubbling, hot and lightly browned. Top with chopped cilantro, if desired.

Makes 6 servings:
620 calories 26 g fat 67 g carbohydrate 15.7 g fiber 37.3 g protein

Tuesday, May 3, 2011

Homemade Chicken Broth


On New Years Eve this year (I know it was a few months ago!) our friends gathered to ring in the new year. A few minutes before midnight, one of my friends asked the others what their new year's resolutions are.

I resolved to lose the baby weight (boring....)

One friend resolved that she was bringing sexy back. She had a child in the previous year and was now a stay at home mom. She found herself all too often staying in sweats and a ponytail and resolved to put a little more effort into her appearance. I thought this was a great idea.

My friend, Julie, resolved that she and her husband were going to eat intentionally. She elaborated that they were trying to be more aware of where their food came from, what was in it and how they could get better control of their food. We have talked about splitting up a cow for beef so we know where our meat comes from. I know she rocks the bread machine for homemade bread. She also told me that they had made some homemade broth and it pretty much made everything they used it in awesome.

Julie's resolution got me thinking about all the processed foods in my life. Although I'm not willing to give it all up (and I don't think she is either...) I could make some changes in the foods that I am able to make my own. For this reason I thought I'd give homemade broth a try.

I purchased a small little roaster chicken and prepared it based off of the Pioneer Woman's recipe. After serving the chicken, I saved the carcass and remaining meat that was on it for some broth. (recipe below, adapted from here).

When all was said and done, I made 8 cups of super flavorful broth! I packaged them up into 2 cup servings (about the size of a can) and laid them flat in the freezer for future use.


A typical one cup serving of chicken broth has 754 mg of sodium. That's a quarter of your daily value in just one cup of broth!!! I'm not quite sure how to calculate out the nutrition facts on this but my best guess is that the homemade version has less than 100 mg of sodium per serving. YET has more flavor from all the other goodies.

Homemade Chicken Broth in a slow cooker

Carcass of roaster chicken or rotisserie chicken
1 chopped onion
2-3 stalks celery, chopped into large chunks
3 carrots, chopped into large chunks
3-4 whole garlic cloves
8 cups water
if desired, additional seasonings such as bay leaves, Italian seasoning, etc.

***My roaster chicken still had a bunch of meat on it as well as remaining skin which had a lot of seasoning on from the original cooking process. For this reason, I didn't add a ton of seasoning. You be the judge of what you need.

Put chicken carcass into large crockpot. Add chopped vegetables and seasoning. Add water. Cook on low for 8-10 hours.

Place a wire strainer over a large tupperware container. Ladle contents of slowcooker into tupperware, allowing the strainer to catch all the solids. Cover tupperware and refrigerate overnight.


The next day, the fat will have risen to the top and solidified. (its ok to gag a little). Scrape the fat layer off the top. Portion out remaining broth into desired servings and freeze until ready to use.

***Original recipe makes a blenderized version utilizing all the scraps in the slow cooker, except the bones. I chose to make more of a clarified version.

Monday, February 14, 2011

Banana Chocolate Chip Muffins / Bread


I have been on a quick bread kick lately. I seem to keep making them as treats to give away or to go along with our meal. So I decided to declare this Quick Breads Week. First up - Banana Chocolate Chip Muffins / Bread.

I had a freezer full of brown bananas and needed to do a little reorganization so they needed to be used. I also am in a calorie burn competition at work and having been pushing extra hard with the workouts, so I'm a little hungrier than normal. So having a sweet fix like banana bread around has been a lifesaver!

I went out in search of a banana bread recipe that was a little different and found one that called for sour cream on Foodies, Inc. So I decided to give it a try.

Original recipe provides (per serving):
194 calories
8.7 g fat
27.4 g carbohydrate
0.9 g fiber
2.8 g protein


I made the usual changes: I substituted reduced fat sour cream for the full fat version as well as used unsweetened applesauce in place of the butter. The result was awesome! I made 12 muffins and 2 medium sized loaves out of a double batch of this. The muffins were gone in just a few days. The loaves made it to the freezer. One was delivered to my coworker who is a new mom. The other one waits in the freezer for it's final resting place (which just might be my belly!).

Rock Your Banana Bread - BETTER

1/3 cup reduced fat sour cream
1/2 tsp baking soda
1/2 cup unsweetened applesauce
1 cup sugar
2 eggs
1 cup mashed ripe bananas
2 cups all purpose flour
1/2 tsp baking powder
1 cup chocolate chips

Preheat oven to 350 degrees. Butter desired baking dish (muffin tin, loaf pan, etc). Combine sour cream and baking soda in a bowl. Cream applesauce and sugar in a large bowl. Beat in eggs, bananas, and sour cream mixture. Sift in flour and baking soda. Stir in chocolate chips. Spoon mixture into pan. Bake for one hour for 9x5 pan, 30 minutes for muffin tin, 45 minutes for 4x8 pan, etc.

Take it out of the oven , let it cool and enjoy! Makes 20 servings. Per serving:

153 calories
3.7 g fat
28.1 g carbohydrate
1.0 g fiber
2.7 g protein

***You could probably omit the chocolate chips here and save a bunch on calories and fat... that really wasn't what I was going for :) ****

Tuesday, January 25, 2011

Poppy Seed Chicken


I have a love for anything with a good crust, any good casserole and anything that can be made ahead or frozen. I feel like I'm always bringing a meal to someone who just had a baby and I find it easiest just to make a big batch of what we're having for dinner and split it up so I have some for the new momma as well.

One of my coworkers had a baby a few weeks ago and I wanted to make some good old comfort food (i.e. an awesome casserole). I've made poppy seed chicken before and assumed I could make it ahead of time and freeze it before baking. So over the weekend, I made up a batch of the awesome casserole - put half of it in an 8x8 for Paul and myself and put the other half in a foil 8x8 for my coworker. The day before I brought it over to her, I cooked up a big batch of brown rice to split between the two of us and picked up an extra bag of broccoli Steamers. Voila -instant comfort meal.

Poppy seed chicken is one of those recipes that you see all over the blogosphere. I decided to go with The Girl Who Ate Everything's rendition. I like that she provides a bunch of different ways to kick it up a notch. I added Worcestershire sauce and celery seed. I've made it with cheddar cheese before too (although that definitely doesn't help the healthful factor).

I guessed that each 9x13 pan would provide about 8 servings of the casserole. Each serving of the original recipe would provide:
511 calories
29.1 g fat
17.1 g carbohydrate
0.1 g fiber
44.9 g protein

I made a few substitutions that you could easily do at home. First, I used fat free sour cream instead of full fat sour cream. I don't really care for fat free sour cream as a topping, but in recipes its usually a pretty good substitute. Next, I used reduced fat Ritz crackers. Lastly, I only used 2 Tbsp of melted butter, instead of 1/2 a cup. I sprayed the top with nonstick spray to ensure that it browned nicely. Overall - pretty AWESOME.

Poppy Seed Chicken - BETTER

5 cups chicken breasts, cooked and cubed
1 cup fat free sour cream
2 cans condensed cream of chicken soup
2 cups crushed reduced fat Ritz crackers (about 1 1/2 rolls)
2 Tbsp melted butter
1 Tbsp poppy seeds
nonstick spray

Additional ingredients to make it fancier (and not included in the nutrition facts):
1 tsp Worcestershire sauce
1 tsp celery salt
1 tsp minced garlic
1 Tbsp lemon juice
1/4 tsp pepper

Boil raw chicken breasts with salt and pepper until done. I usually do this in a crockpot with frozen chicken breasts and a 1/4 cup of water on high for a few hours. Let chicken cool and cut into one inch cubes. Place cubed chicken in a 9x13 casserole dish. (If splitting, use two 8x8 pans).

Stir together condensed soup and sour cream. IF you wish to add the additional flavorings, add them in now. Stir well and pour over the chicken.

In a separate bowl, stir together the crushed crackers, poppy seeds and melted butter. Sprinkle over the chicken and sauce. Evenly spray with nonstick spray.

Cover with foil and place in freezer if keeping for later. When ready to bake, thaw completely in the fridge. Uncover and bake in a 350 degree oven for 30 minutes or until the top of the casserole is browned and the sauce is bubbly. Serve plain or over brown rice.

Makes 8 servings. Per serving:
393 calories
12.4 g fat
21.6 g carbohydrate
0.1 g fiber
45.4 g protein

On another note.... I'm hosting 15 people over at my house on Sunday and want to make something in the crockpot that will be ready after church... any suggestions?

Monday, January 10, 2011

Minestrone

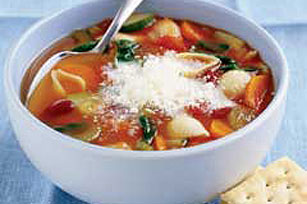
I forgot to take a picture of my minestrone. So I found a picture online of one that closely resembles my soup. Thanks kraftfoods.com!


I love soup in the winter time. I live in Michigan and it is pretty much cold and snowy from November to April so there are lots of opportunities for soup night. Soup is versatile because many soups can be made ahead of time and frozen or cooked low and slow in the slow cooker if you have a busy afternoon.

I have had this recipe for Minestrone from Allrecipes since November of 2004 (according to the date that I printed the original recipe). This was the first thing that I ever made for my now husband. He is not a huge vegetable eater but LOVES this minestrone. I have since passed on this recipe to my mom, who always gets requests for it from her friends. I have also put it in my work cookbook, etc. So needless to say - this is pretty much the best minestrone ever.

Last week, one of my friends had a baby and I wanted to bring her some meals. I knew we'd be eating minestrone later in the week so I made an extra large batch on Sunday afternoon. I froze a gallon ziplock for her and froze a big plastic container for my family so it would be ready to eat later in the week.

I did not make many nutrition changes to the recipe. I do not add Parmesan or extra olive oil on top of the soup (does anyone else find drizzling olive oil on top of soup weird?). This is the first time I have ever put the red wine in the recipe, and thats just because I happened to have an open bottle of wine. If you were watching your sodium intake, you may consider choosing reduced sodium chicken broth and tomato sauce.

Minestrone

3 Tbsp olive oil
3 cloves garlic, chopped
2 onions, chopped
2 cups chopped celery
5 carrots, sliced
2 cups chicken broth
2 cups water
4 cups tomato sauce
1/2 cup red wine (optional)
1 cup canned kidney beans, drained
1 (15 oz) can green beans
2 cups baby spinach, rinsed
3 zucchinis, quartered and sliced
1 tsp dried oregano
2 tsp dried basil
salt and pepper to taste
1/2 cup dry seashell pasta

In a large stock pot, over medium-low heat, heat olive oil and saute garlic for 2 - 3 minutes. Add onion and saute for 4 to 5 minutes. Add celery and carrots, saute for 1 to 2 minutes. (You can also do this in your crockpot. Turn it to high with the oil in. Add the garlic. Let that cook while you are cutting your onion. Add the onion. Let that cook while you are chopping your celery and carrots. Add to crockpot and give a good stir. Allow to cook in crockpot for 10-15 minutes or until the veggies appear to cook a bit.)

Add chicken broth, water and tomato sauce, bring to a boil, stirring frequently (Or cook in crock pot on high for an hour). If desired, add red wine at this point. Reduce heat to low and add kidney beans, green beans, spinach, zucchini, oregano, basil, salt and pepper. Simmer for 30 to 40 minutes, the longer the better. (Turn crock pot to low, cook for at least 2 to 3 hours).

***If you are preparing this for the freezer. Transfer to freezer containers at this point and freeze***

When ready to eat. Cook seashell pasta according to package directions. Put 2 Tbsp pasta shells in the bottom of each bowl. Ladle soup over the pasta. Top with Parmesan if desired.

Makes 8 LARGE servings. Each serving provides:
195 calories
5.9 g fat
30.3 g carbohydrate
7.4 g fiber
6.2 g protein

Wednesday, January 5, 2011

Turkey Noodle Soup


I'm not a big fan of ham. Holidays like Christmas often have ham served as the main meat. I try to convince my mom that this isn't that big of a deal to me because I'm really just happy eating side dishes. But each year she wracks her brain trying to come up with an alternative to ham. Last year we had a beef roast, this year we had turkey. And by turkey, I mean my mom had made a TON of turkey. So needless to say, I was sent home with a large container of prepared turkey.

I wasn't quite sure what to make out of the turkey. In fact, it sat in my freezer for a week before I decided it's fate. Turkey Noodle Soup.

What would you have made out of leftover cooked turkey?

I looked for a recipe that had homemade noodles and found this delicious looking recipe for Chicken Noodle Soup on For the Love of Cooking. I figured I could easily just swap out the chicken for turkey. As prepared in the original recipe, each serving provides:

278 calories
3.8 g fat
39.2 g carbohydrate
2.5 g fiber
21.2 g protein

Other than swapping out the chicken for turkey, I made a few other changes. I increased the amounts of onion, celery and carrots, as well as added an extra cup of frozen stir fry veggies. I also made the full recipe for the noodles (with half the flour being whole wheat) but only put half in the recipe. After allowing the other half of the noodles to dry out for an hour or two on the counter, I put them in a ziplock bag in the freezer for soup for another day. It ended up being delicious! It was perfect for a cold, snowy Michigan weekend and even better reheated for lunch the next day.
Turkey Noodle Soup - BETTER

8 cups chicken stock
1 tsp olive oil
1 onion, diced
2 cloves garlic, finely diced
2 cups diced carrots
4 stalks of celery diced
2 tsp good chicken bouillon
1 bay leaf
sea salt and fresh black pepper, to taste
1/ tsp dried thyme or basil
1 1/2 cup cooked turkey, diced
1 cup frozen stir fry veggies
Fresh parsley, chopped

Saute onions in olive oil until soft, about 3-4 minutes. Add garlic & cook for 30 seconds. Add broth and the remainder of the ingredients. Cook over medium low heat for 1-2 hours. Meanwhile, prepare noodles.

Noodles:
1 cup flour
1 cup whole wheat flour
3/4 tsp salt
1 egg
1/4 to 1/3 cup skim milk

In a mixing bowl, combine flour, salt, egg and milk. Mix until you produce a slightly sticky ball of dough. Flour the counter and roll out dough to 1/8 inch thickness. They plump when cooked so make sure you roll them out thin. Cut noodles using a pizza cutter. Cut them smaller than you imagine because they will grow in the broth! Let the noodles dry out on the counter for at least 1 hour before adding them to the soup. After 1 hour, take half of the noodles and put in a ziplock bag in the freezer for another time.

About 30 minutes before serving soup, drop noodles in and cook. Add some fresh chopped parsley right before serving.

Makes 6 servings. Each serving provides:
192 calories
3.7 g fat
24.5 g carbohydrate
3.4 g fiber
16.2 g protein

Thursday, December 9, 2010

Super Easy Spaghetti Pie


Pasta is often my go-to dinner when short on time or I don't have anything planned for dinner. I always have an abundance of pasta, sauces (gasp! I RARELY make homemade) and protein to add on hand, so its something I can quickly throw together. For my real job, I came across this recipe on The Pioneer Woman's recipe site Tasty Kitchen. Sounded like a good variation of my traditional pasta dishes, so I gave it a try!

As listed, each serving (6) of this recipe provides:
607 calories
38.9 g fat
38.1 g carbohydrate
3.2 g fiber
24.8 g protein

Like usual, I was making this the night before. I put half of the recipe in a 9x5 loaf pan for the next night and kept it in the fridge. I put the other half in a foil lined 9x5 loaf pan for a freezer meal. Afterall, there's only two of us eating real food in the house and I figured that it would be enough for the husband and myself, plus leftovers for lunch the next day.


I made quite a few changes to the recipe but I think I still got the same tasty outcome:
  • substituted whole wheat spaghetti for traditional
  • used 4 egg whites instead of 2 whole eggs
  • used 1 green + 1 red pepper instead of just one pepper
  • used 3/4 of a pound of Italian sausage instead of a full pound
  • Omitted the olive oil as there was plenty of oil in the pan from the cooked sausage
  • used reduced fat sour cream instead of full fat
  • used part-skim mozzarella instead of whole milk mozzarella

I know that sounds like a whole lot of change, but really, it was what we already had in our house - so it was no big deal. I also omitted mushrooms because I'm pretty sure my husband might die if a mushroom crossed his lips, or so he makes me believe.

When all was said and done, this was delicious! The sausage gave the dish a really powerful flavor. I'm sure I could have decreased the fat even more if I had used turkey sausage, but that's not always so easy to find. The peppers also added a lot of flavor. I'm looking forward for when I pull the other half out of the freezer!
Super Easy Spaghetti Pie - BETTER

1/2 pound whole wheat spaghetti, cooked
4 egg whites
1/4 cup Parmesan cheese
1 whole onion, chopped
1 red + 1 green pepper, chopped
1 cup mushrooms (optional)
3/4 pound Italian sausage
1/2 cup reduced fat sour cream
1 cup spaghetti sauce
1 cup part-skim mozzarella cheese

Combine 1/2 pound of cooked spaghetti while it is warm with beaten egg whites and Parmesan. Pour coated pasta into a deep dish pie pan or a 9-inch baking dish. Set aside. (I put half in a loaf pan for now and half in a loaf pan for the freezer).

Saute Italian sausage in a large pan. After about 5 minutes, move sausage to the side. Cook the chopped onion, peppers and mushroom in the same pan. Saute until veggies are soft. Remove the sausage and set aside.

Take pan off of the heat and add about a 1/2 cup of reduced fat sour cream and stir into the veggies.

To assemble the pie - pour the creamy vegetable mix onto the spaghetti "crust". Next cut up the sausage and place a layer of pieces on the vegetables. Cover it all with a layer of spaghetti sauce and then a layer of shredded mozzarella.
Bake at 350 degrees for 30 minutes.

Makes 6 servings, per serving:
436 calories
25 g fat
31.3 g carbohydrate
5.1 g fiber
23.8 g protein

Monday, November 8, 2010

Chicken Pot Pie


Confession: I’m a dietitian and I LOVE pie crust. I know I could have made this (or any pie recipe) healthier by only doing a top crust and forgoing the bottom crust, but I refuse.

With that being said, YOU (as it is not an option for me) could save 161 calories, 10 grams of fat and almost 15 grams of carbohydrate by simply making it with a top crust only. That is… if crust isn’t your thing.

I am on a comfort food kick and definitely put chicken pot pie in that category. So in search of a chicken pot pie recipe, I came across this recipe from Our Best Bites. It’s the perfect traditional chicken pot pie – no frills or crazy ingredients – just what you imagine your grandma making. As printed in the original recipe (and with a DOUBLE crust), 1/8th of this pie provides:

578 calories

27.4 g fat

60.3 g carbohydrate

5.4 g fiber

22.6 g protein

I didn’t make huge changes to this recipe. I used 3 potatoes, instead of 5 potatoes and omitted the butter. I also used 98% fat free cream of chicken soup instead of the full fat version. I also tried replacing one cup of white flour with one cup of wheat flour in the pie crust recipe. To be honest, this small change didn’t make that much of a difference in nutritional value, however I was more curious to see if I could still get a flaky crust with whole wheat flour in the recipe. It turned out pretty good! Especially for a savory recipe like this one.

Chicken Pot Pie – BETTER

Crust

1 cup wheat flour

1 ½ cup white flour

1 tsp salt

2/3 cup + 2 Tbsp shortening

Ice water (approximately ½ cup)

Combine flours and salt in a medium sized bowl. Cut in shortening with a pastry blender or two knives until you get about pea sized pieces.

Sprinkle ice water in about a tablespoon at a time. Very gently, turn the dough with your fingers so it gets exposed to the water. Gradually, all of the flour mixture will be moistened. Divide the dough into two balls. Wrap in plastic wrap and keep in the refrigerator until ready to use.

When ready, roll out one ball on a lightly floured surface until it is big enough to fit in your pie pan. When ready for the top, roll out the second ball and place it on top of your filling as desired. For a good picture demonstration of crusts, check out the original recipe here.

Filling

2 chicken breasts, cooked and chopped into bite size pieces

1 12-16 oz. bag frozen vegetables, thawed

1 onion, minced

3 medium-small red potatoes, diced

2 cans 98% fat free cream of chicken soup

Ground black pepper, to taste.

Preheat oven to 400 degrees. Bring a large pot of water to a boil. When ready, add potatoes and boil until tender.

In a mixing bowl, combine cream of chicken soup, chicken, vegetables, onion and potatoes. Season to taste.

Add the filling to prepared pie crust. Top as desired with second crust. (Or save yourself some fat and calories by omitting the bottom crust!) Make sure you cut vents into the top of the crust to let out the steam.

Place the pie on a baking sheet and bake for 40-45 minutes or until the crust is golden brown. Remove from oven and allow to stand for a few minutes before serving.

Per serving:

536 calories

25.1 g fat

61.8 g carbohydrate

8.1 g fiber

18.0 g protein

***This recipe could also be made ahead or doubled and put in the freezer for up to 3 months. Put the UNBAKED pie in the freezer, covered in foil. When desired, pull the pie out of the freezer 24 hours in advance and put in your refrigerator. You may have to increase the cooking time by 15 minutes or so.

Glazed Mini Meatloaves


I am always in the search for a good meatloaf recipe. I know meatloaf doesn’t scream healthy but it’s a good comfort food. Now that fall is in full swing, I occasionally want a hot dinner that makes me feel like putting on my sweats, slipping on my slippers and curling up on the couch. Meatloaf does that for me. Unfortunately I’ve tried a slew of meatloaf recipes and have had numerous fails. I’ve pretty much settled on sticking with the recipe on the box of French onion soup mix.

I knew that my husband was going to be outside all day on a cold Saturday for work and wanted to make something warm and hearty for when he got home. I came across this meatloaf recipe at My Kitchen Addiction and thought I’d give them a try. As prepared on the original recipe, each serving provides:

6 servings

466 calories

27.3 g fat

28.0 g carbohydrate

0.5 g fiber

27.3 g protein

Now I wasn’t planning on making this the healthiest meatloaf ever, just tweaking it here and there to make a small improvement. I’ve had a roll of sage sausage in my freezer for what seems like forever and I never knew what to do with it (I mean really, what do people do with SAGE sausage?). So I thawed it out and used that as the pork portion of this recipe. I also changed the saltines to reduced fat Ritz crackers, used skim milk instead of whole milk, eliminated the oil for browning in the pan and decreased the brown sugar in the glaze.

These were AWESOME! My husband is still raving about the best-meatloaf-EVER two days later. In fact, I’m pretty sure I’m excited that I’m having one for leftovers tonight. Give them a try!

Glazed Mini Meatloaves – BETTER (Makes 6 loaves)

17-20 Reduced fat Ritz crackers, crushed fine

¼ cup skim milk

1/3 cup minced fresh parsley (Or 2 Tbsp dried)

3 Tbsp Worcestershire sauce

1 large egg

1 ½ Tbsp Dijon mustard

1 tsp onion powder

1 tsp garlic powder

1 tsp salt

½ tsp pepper

1 ½ pounds ground meat (I used a combination of lean ground chuck and sage sausage)

Glaze:

½ cup ketchup

2 Tbsp packed brown sugar

4 tsp cider vinegar

Adjust an oven rack to the middle position and heat the oven to 425 degrees. Stir cracker crumbs, milk, parsley, Worcestershire sauce, egg, mustard, onion powder, garlic powder, 1 tsp salt and ½ tsp pepper together in a large bow. Add ground meat and combine until uniform (I found this easiest to do with my hands – yuck!). Shape mixture into oval loaves. I made six loaves.

Heat nonstick skillet over medium heat. Add meatloaves (without letting them touch sides and brown well on one side, 3-5 minutes. Carefully flip loaves over. Brown on this side for another 2-3 minutes.

Meanwhile, mix glaze ingredients together until smooth. Transfer mini meatloaves to a foil-lined baking pan and spoon the glaze over the top of each meatloaf. Bake for 18-20 minutes, until the center of the loaf registers 160 degrees on an instant-read thermometer.

Nutrition facts:

396 calories

27.9 g fat

16.6 g carbohydrate

0.2 g fiber

18.2 g protein.

***Before baking, you can wrap individual loaves in plastic wrap, then foil and deep freeze for later. Just thaw individual meatloaf and bake as described... it may need an extra minute or two.

Thursday, October 14, 2010

Jen's Frozen Beef Enchiladas


Make ahead meals are something I’ve thought about for a while but haven’t had much success in actually making them. Not because the recipes don’t turn out… but because I previously had no where to store them. When we built our new home six months ago we purchased a deep freezer and my make ahead possibilities seem to be endless. Many people plan make ahead meals when they are getting ready for a new baby. I, however, had a baby eight weeks ago and didn’t do much make ahead meals prior to delivery but rather now, during my maternity leave. I am preparing to return to work full time in a few days and hope to have several make ahead meals ready in the freezer for when I come home from work and still want a home-cooked meal on the table.

Upon searching for make ahead meals, I came across this post at The Sisters’ CafĂ© which lists many make ahead meal options. I chose to make Jen’s Frozen Beef Enchiladas. As listed, this recipe’s nutrition facts are as follows:

588 calories

21.3 g fat

55.3 g carbohydrate

3.7 g fiber

41.2 g protein

My husband and I really enjoyed these enchiladas, and I’m looking forward to when we have the second frozen portion in the future.

As a main dish, this isn’t too bad for fat or calories. But if you are trying to watch your waistline, every little bit makes a difference! I only made two small substitutions. I decreased the portion of meat and added a can of black beans for protein and added fiber, without the additional fat of meat. I also substituted 2% cheese as I often do in recipes. When cutting the fat in cheese, 2% typically cooks similarly to its full fat counterpart and I rarely notice a change in taste. Fat free cheese, however, I NEVER recommend. It doesn’t taste cheesy and it doesn’t melt – not exactly what I want on my enchiladas!

Jen’s Frozen Beef Enchiladas – BETTER

1 pound eye of round beef

1 can red enchilada sauce

1 ½ cups shredded 2% cheese

1 can diced green chilies

1 can black beans, rinsed and drained

15 7-8” tortillas

1 additional can red enchilada sauce

½ c. shredded 2% cheese

Leave the roast in crock pot all day with a cup of water. After about 5-7 hours on high heat, it should shred pretty easily.

Add one can red enchilada sauce, 1 ½ c. cheese, green chilies, and drained black beans to shredded beef. Put meat mixture in tortilla and wrap. Place in a freezer bag. When ready to bake, put in baking dish (10 fit in a 9x13, 5 fit in an 8x8). Pour additional can of enchilada sauce on top and sprinkle with ½ c. cheese. Bake at 350 degrees for 35-40 minutes.

529 calories

13.1 g fat

63.2 g carbohydrate

6.5 g fiber

37.4 g protein